
Laying the sliding layer of the coke oven regenerator
1. Build the foundation platform first, adjust and correct the resistance wall, and prepare to lay the sliding layer after passing the inspection.
2. When using river sand to lay the sliding layer, the river sand must be flat and uniform in thickness.
3. A layer of petroleum asphalt felt must be laid between the refractory bricks and the river sand sliding layer before masonry.
4. When using thin steel plates as sliding layers, the following requirements should be observed:
(1) The sliding layer should be laid once before bricklaying, and the bottom of the steel plate should be coated with yellow dry oil before laying. (2) After the steel plate is laid and inspected and passed, apply a thin layer of yellow dry oil on the surface of the steel plate, then lay a layer of petroleum asphalt felt, and then lay bricks.
(3) It is strictly forbidden to recycle and reuse mud stained with oil.
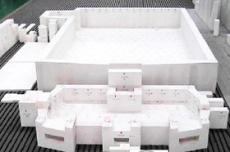
Bricklaying process of small flue and regenerator wall of coke oven regenerator
1. Before laying the small flue, mark the width edge of each wall at the center line mark of the combustion chamber, and mark the height line of each brick layer on the vertical pole. You can also use the method of measuring and laying out the lines by wall.
2. The first layer of masonry of the small flue should be pre-laid dry. After checking that the width of the reserved expansion joint is qualified, lay out the lines to lay out the furnace head of the main wall of the small flue.
3. The furnace head position needs to be laid several layers of bricks at a time, and the wall should be stepped to prevent the furnace head from moving on the sliding layer.
4. During masonry, check and verify the horizontal and vertical degree of the masonry according to the center line many times to prevent the furnace wall from twisting.
5. The masonry process should be cautious and careful, and the furnace head position should not collide. When changing shifts, first check and confirm whether the furnace head position has been moved and make adjustments.
6. Check the straightness of the masonry wall at any time. After the small flue wall is built, check the brick layer elevation and gradually level it.
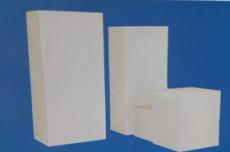
Process of laying lining bricks and grate bricks in the regenerator of coke oven
1. First build the central partition wall. After the masonry is completed and the construction area is cleaned, lay the lining bricks. The masonry order should be from the center to both sides.
2. Lay yellow cardboard when laying bricks. After the lining bricks are laid, use wooden supports to fix them to ensure that the width of the expansion joint between the lining bricks and the furnace wall does not change during masonry.
3. After the lining bricks are laid, clean the bottom and wall of the small flue, lay a layer of 10-15 mm clean sawdust at the bottom of the small flue, and then lay grate bricks layer by layer from the center to both sides. The refractory mud squeezed out of the brick seams of the brick layer should be cleaned at any time.
4. When laying grate bricks with holes, strictly check the aperture of the grate bricks, and then lay them after they are qualified. When laying the grate bricks of the air and gas regenerators, first conduct pre-laying dry laying and seam inspection before formal laying.
5. Use a wooden ruler to check the straightness of the grate brick legs, and the gap error should meet the construction requirements.
6. After the grate bricks are laid, clean the expansion joints and inspect them. After passing the inspection, lay wooden protective plates on the grate bricks. The gap between the protective plates and the wall shall not exceed 15 mm.
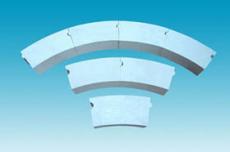
Coke oven regenerator wall brick laying process
1. First lay the center partition wall. After the masonry is completed and the construction area is cleaned, lay the lining bricks. The laying order should be from the center to both sides.
2. Lay yellow cardboard when laying bricks. After the lining bricks are laid, use wooden supports to fix them to ensure that the width of the expansion joint between the lining bricks and the furnace wall does not change during laying.
3. After the lining bricks are laid, clean the bottom and wall of the small flue, lay a layer of 10-15 mm clean sawdust at the bottom of the small flue, and then lay the grate bricks layer by layer from the center to both sides. The refractory mud squeezed out of the brick seams of the brick layers should be cleaned at any time.
4. When laying grate bricks with holes, strictly check the aperture of the grate bricks, and then lay them after passing the inspection. When laying grate bricks in air and gas heat storage chambers, first conduct pre-laying dry laying and seam inspection and then formally lay them.
5. Use a wooden ruler to check the straightness of the grate brick leg, and the gap error should meet the construction requirements.
6. After the grate bricks are laid, clean the expansion joints and inspect them. After passing the inspection, lay wooden protective plates on the grate bricks. The gap between the protective plates and the wall shall not exceed 15 mm.
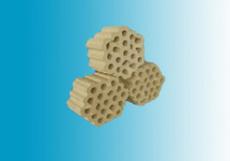
Laying process of checker bricks in coke oven regenerator
1. After the furnace body is laid, clean the secondary grooves on the top of the regenerator cover with air, and mark the control line between the center partition wall and the sealing wall on the regenerator wall.
2. Use compressed air to clean the checker bricks and start to prepare for laying checker bricks.
3. When the first layer of checker bricks is dry-laid, check the placement and stability of the checker bricks and then dry-lay the lower layer of checker bricks.
4. The checker brick layers after the second layer should be stepped back from the center partition wall to the furnace head for dry-laying.
5. Frequently check the lattice holes of each layer of checker bricks for smoothness, and the upper and lower layers of checker bricks should be aligned.
6. Yellow cardboard can be used to maintain the gap width and stability between the checker bricks and the regenerator wall, and non-flammable materials must not be used as padding.
7. After the dry-laying of checker bricks in each regenerator is completed and the inspection is qualified, start to lay the regenerator sealing wall.
8. The regenerator wall and checker bricks of the sectional regenerator coke oven should be laid alternately in sections. Before each section of checker bricks is laid, the sealing wall or partition wall of this section should be completed first, and the grooves on the wall should be cleaned. During the dry laying of checker bricks, pay attention to prevent the refractory mud from falling into the checker bricks of the next section. After the dry laying is completed and the inspection is qualified, immediately cover the protection plate. The protection plate should be set firmly and tightly, close to the wall of the regenerator to prevent the refractory mud from leaking into the checker bricks.


 HOME
HOME